10 Oral Motor Staples for Feeding Therapy
Posted by Debra C. Lowsky, MS, CCC-SLP on 2nd Oct 2017

As a feeding therapist, there are a lot of different tools in my therapy bag. These are my favorites:
.
PROBE
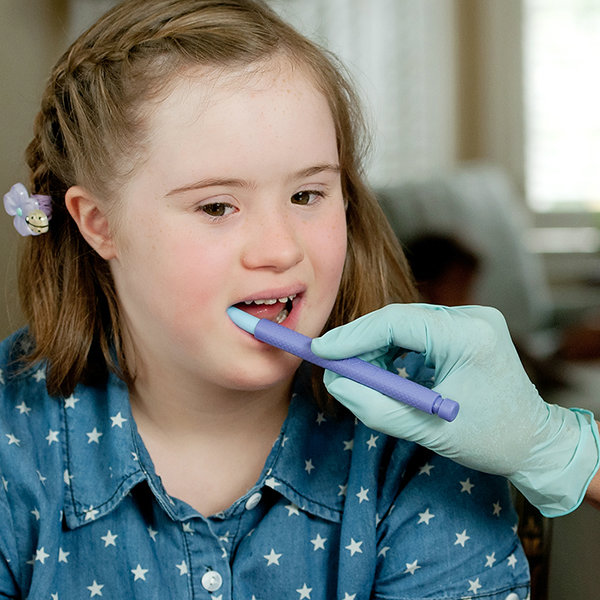
The Probe is a simple but versatile tool for both feeding and oral motor applications. It was the very first product my husband and I made together 18 years ago, and it’s still a staple in my therapy bag today.
The Probe has a white handle with a blue textured tip. The white handle is rigid for an easy grip; the blue tip is softer and rubbery to apply gentle sensory input.

For oral motor applications, I’ll use the Probe for everything from tongue pops to tongue tip elevation to jaw strength exercises.
For feeding therapy, I dip it into purées and let kids use it as a “dipper spoon.” The bumpy nubs work well to hold yogurt, applesauce, some baby foods, etc. The bumps/ridges on the tip add texture to the purées to help encourage texture acceptance.
If there are sensory issues in the mouth (as there often are in feeding therapy), I’ll use the Probe to gently stroke areas that need more awareness. For example, if the child doesn’t know where their tongue is in time and space, I’ll stroke the sides of the tongue and inside the cheeks, which helps increase awareness of that area and helps stimulate the tongue to move from side to side (the tongue’s gut instinct will usually be to move towards the Probe, or anything in their mouth for that matter).
If it’s a tongue bolus we need to work on, I’ll rub the Probe on the top middle of the tongue and press down gently, to help the child know that that’s where they need to ‘cup’ their tongue.
If the child has hypersensitivities (too much sensitivity) in the mouth, I start with the smooth sides of the Probe, eventually progressing to the side with the lines (which will provide a little more input), then eventually to the bumpy side (which provides the most input).
.
.
Z-VIBE
The Z-Vibe is kind of like a Probe on steroids. It can be used in all the same ways as above. But, it can also be turned on to VIBRATE if/when more sensory input is needed for added awareness.

The smooth, gentle vibration of the Z-Vibe can be helpful in both oral motor and feeding therapy to help “wake up” the mouth, bringing awareness and organization. It can also help desensitize the mouth if there are food/texture aversions.
The Z-Vibe comes standard with a Probe Tip (the same versatile tip end as the Probe). There are lots of additional tip attachments for the Z-Vibe. You can untwist the Probe Tip and twist in any other tip - so the same handle can be used for a variety of different goals.
.
.
SPOON TIPS FOR THE Z-VIBE
These spoon attachments for the Z-Vibe turn it into a vibrating spoon. A vibrating spoon might sound odd at first - but it’s not a ‘wiggly’ vibration. It’s very smooth - so you don’t get food vibrating off of the spoon at all. From just looking at the Z-Vibe, you can’t actually tell that it’s vibrating even. But when you take a bite, you’ll feel the vibration on your lips and tongue to help “wake them up” and learn to better manage/accept the food.
.

.
.
ANIMAL TIPS FOR THE Z-VIBE
The Animal Tips are attachments for the Z-Vibe, too. They’re fun and friendly “pets,” so these are great for kids in general, but especially for those who are a little uneasy about feeding therapy and/or food. Dip them in purées and sticky foods to encourage mouthing and chewing and oral exploration. The ears of the mouse and dog can also be used as spoons.
When used as a set together ( cat + mouse + dog) you can also use them to work on jaw grading skills.

.
BITE-N-CHEW TIPS FOR THE Z-VIBE
These are attachments for the Z-Vibe as well, for biting and chewing as the name suggests :). These are great if you need to practice biting/chewing skills without the risk of choking. They come in 4 different versions: smooth/thinner, textured/thinner, smooth/thicker, and textured/thicker. Use the textured versions for extra tactile input. Start with the thinner versions and progress to the thicker versions to gradually build jaw strength.
.

.
.
BITE TUBE TIPS FOR THE Z-VIBE
These are similar to the Bite-n-Chew Tips, but with a hollow core. Because the Bite Tube Tips are hollow tubes, you can put food inside so that when a child bites down on one, they’ll be rewarded with a taste of food. So you can use these for functional biting/chewing practice with real foods (puréed foods, like applesauce, yogurt, baby foods, etc.).
For a different experience, I’ve also filled these with jello and put them in the freezer to harden. Not only is this a nice frozen treat for the child, but cold can also help increase awareness.
.
ORO-NAVIGATOR
Tongue lateralization is a critical oral motor skill for feeding. You can’t properly manage foods orally or manipulate food particles into a bolus unless you have tongue lateralization. Whenever parents say their child isn’t progressing to solid foods, one of the first things I ask about and check for is tongue lateralization.

The oro-Navigator is a neat tool to help teach the concept of tongue lateralization, if needed. Just place the cuff over the side of the tongue, and gently use the oro-Navigator to guide the tongue from one side of the mouth to the other. Then repeat on the other side. Sometimes this is all that’s needed for that “aha - that’s what my tongue needs to do” moment.
.
.
GRABBER / Y-CHEW
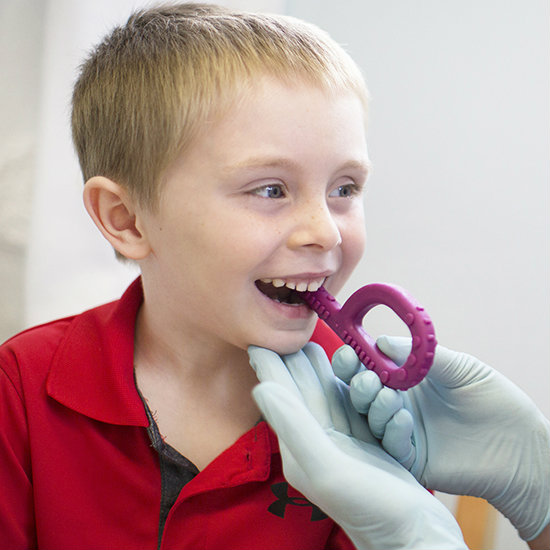
The Grabber and Y-Chew are both chew tools. The Grabber is P shaped, the Y-Chew is well... Y shaped! For the most part, these can be used interchangeably. To learn more about the nuances between the two, click here. Me personally, I tend to gravitate to the Grabber. My husband and I created the Grabber shortly after the Probe, so it was one of our very first products, and still very dear to me - and still one of my favorite versatile tools to have on hand.
.

.
Chew tools I use for everything from jaw strength to teaching the concept of biting/chewing, to helping to develop a mature rotary chewing pattern and rhythmic chewing. Like everything else above, you can also dip these in foods the child already accepts to help introduce them to new sensations/textures (and to practice biting/chewing skills without the risk of choking on real food).
.
.
LIP BLOK
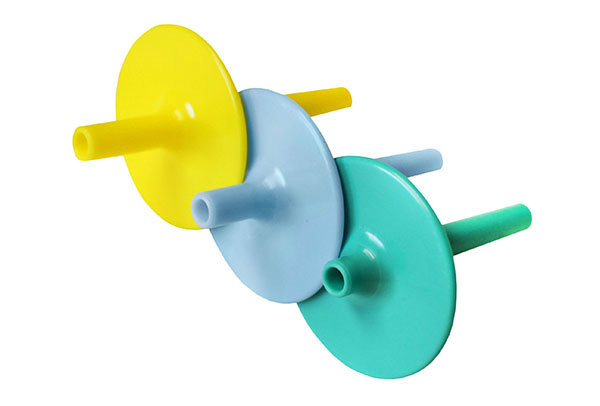
The Lip Blok is essentially an add-on for your straw that fits into the top of the straw. This mouthpiece immediately prevents kids from putting the straw too far back into the mouth. (Some kids will put way way too much of the straw into their mouth, which means liquid gets deposited in the back of the mouth where they’re more likely to choke/aspirate/cough on it.)

The Lip Blok comes in 3 sizes. The yellow one lets ¾” of the straw inside the mouth - that’s the one to start with (it’s the easiest to use). When the child can drink from that comfortably, then you progress to the middle blue (½”) one. Then eventually to the shortest turquoise (½”) one. This doesn’t happen right away, it can take a while sometimes. But the end goal is for kids to only put ¼” of the straw into the mouth. That’s the position where you'll get the best oral motor workout - where the lips have to close the most, the cheeks have to tense the most, and the tongue has to tighten and retract the most.
These are best when used at every meal with every drink, so this is a great take-home tool for at home follow-through with parents.
.
.
BEAR BOTTLE
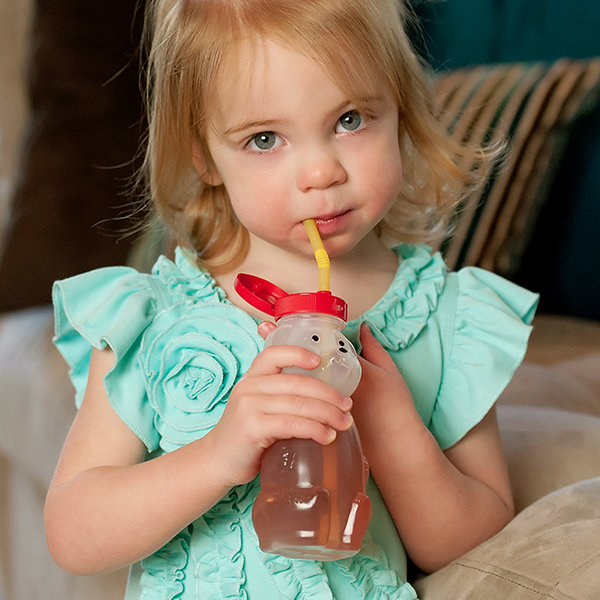
This friendly Bear Bottle is a straw cup that can be really helpful for beginning straw drinkers, and/or for kids with oral motor difficulties.
.

.
To ‘prime’ the straw, squeeze the bear’s belly and the drink will fill up the straw. When you let go, the drink will stay there at the top of the straw - the valve prevents it from falling back down into the cup. Since the straw stays full, only a small effort is required to take a sip.
.
I hope you find this list useful!
Be sure to also check out the related post, 75+ feeding therapy tips & techniques.
Debbie
Debra C. Lowsky, MS, CCC-SLP
.

